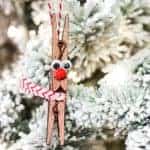
Wooden Clothespin Reindeer Ornament
This easy Christmas craft is a fun and festive Christmas activity for kids. Turn clothespins into a cute ornament for your tree or as a gift.
Servings: 1 Reindeer Ornament
Equipment
- Foam brush
- Ruler
- Craft glue or hot glue gun
Ingredients
- 3 Wooden clothespins
- Brown paint
- Small pre-made bows or Holiday Ribbon
- Small googly eyes
- Red button or pompom
- Ribbon or twine
Instructions
- Paint 3 clothespins with brown paint. Allow to dry completely before applying a second coat. Allow that coat to dry completely before moving on to the next step.
- Using the craft glue or glue gun, attach two of the clothespins front to back (refer to the photo). This is the body of the reindeer.
- Cut a 4” length of ribbon and fold it in half, making a crease (this is your middle point). At the crease, attach the ribbon to the back of the reindeer’s body, about 1” from the top, with a bit of glue and tie it into a double knot around the front. This is his scarf.
- Using the craft glue or glue gun, attach the final clothespin to the front of the body, just above the scarf. This is the reindeer’s head.
- Using the craft glue or glue gun, attach the red button or pompom to the reindeer’s head, covering the hole of the clothespin. Attach the eyes above the nose.
- Cut a 6” length of ribbon or twine, form a loop, and using the craft glue or glue gun, attach it to the top of the back side of the ornament. Allow to dry completely before hanging.