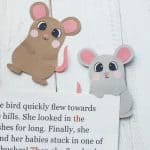
Papercraft Mouse Bookmarks
Here is a fantastic DIY bookmark craft for kids. Making a corner bookmark is an easy craft idea for kids, and these mouse bookmarks are super cute.
Servings: 1
Ingredients
- Printable Mouse Template
- Colored craft papers
- Sharpie
- Craft glue
- Pencil
- Scissors
Instructions
- Download and print the MOUSE BOOKMARK TEMPLATE SHEET.
- Select grey and pink colored craft papers like we did. Trace the nose, tail, blush and inner ear patterns on the pink paper and trace the outer ear patterns, body base, lower legs and upper legs on grey colored craft paper. Cut out the traced patterns nicely.
- Attach the inner ear cutouts in the middle of the outer ear cutouts. Attach the lower legs on the bottom side of the body base.
- Attach the ear patterns on the top side of the body base pattern.
- Attach the nose and blush cutouts on the head part of the body base. Attach the tail cutout on either side of the body base pattern.
- Attach the eye cutouts above the nose, on the head part. Use a sharpie or gel pen to draw the mouth-line of the papercraft mouse figure.
- Apply glue along the side of the body base and attach the upper leg cutouts on the side and keeping the rest of the upper leg free from glue.
- Similarly, attach the other upper leg on the other side.
- To use the papercraft mouse as a bookmark, you can simply slide a page under the upper legs; between the upper legs and the body base.